Microsoft 365 integration setup
Integrating Roomzilla with Microsoft 365 account
With our Microsoft 365 integration, any room reservation made by your users in Outlook Calendar instantly appears on your connected Roomzilla tablets and interactive maps.
You can also invite people from outside your organization—like business partners or guests—directly from Roomzilla to conveniently share your Microsoft 365 resources with them.
Follow the steps below to prepare your organization’s Microsoft 365 account and enable real-time synchronization of Users, Resources, and Reservations with Roomzilla.
Step 1:
Setting up your Microsoft 365 account for integration
- Log in to the Microsoft 365 admin center with your admin account.
- Create your rooms in the admin center; go to the Resources > Rooms & equipment page [link][1].
- Here, you will see the list of existing resources as well as the option to add [2]


4. Fill in the required fields for your resources.
Note: During the integration process, Roomzilla fetches resource information from Microsoft, such as: Resource type [A], name [C], and capacity [C]. Certain details become uneditable within Roomzilla [B, C].
Note: For newly created Microsoft 365 accounts, it may take up to 48 hours for the resource calendars to become available. Please make sure your resource calendars are accessible in Outlook before enabling the integration.
Now that you have finished setting up your Microsoft account, head back to your Roomzilla page to enable the integration.
Step 2:
Enabling integration with Microsoft 365 in Roomzilla
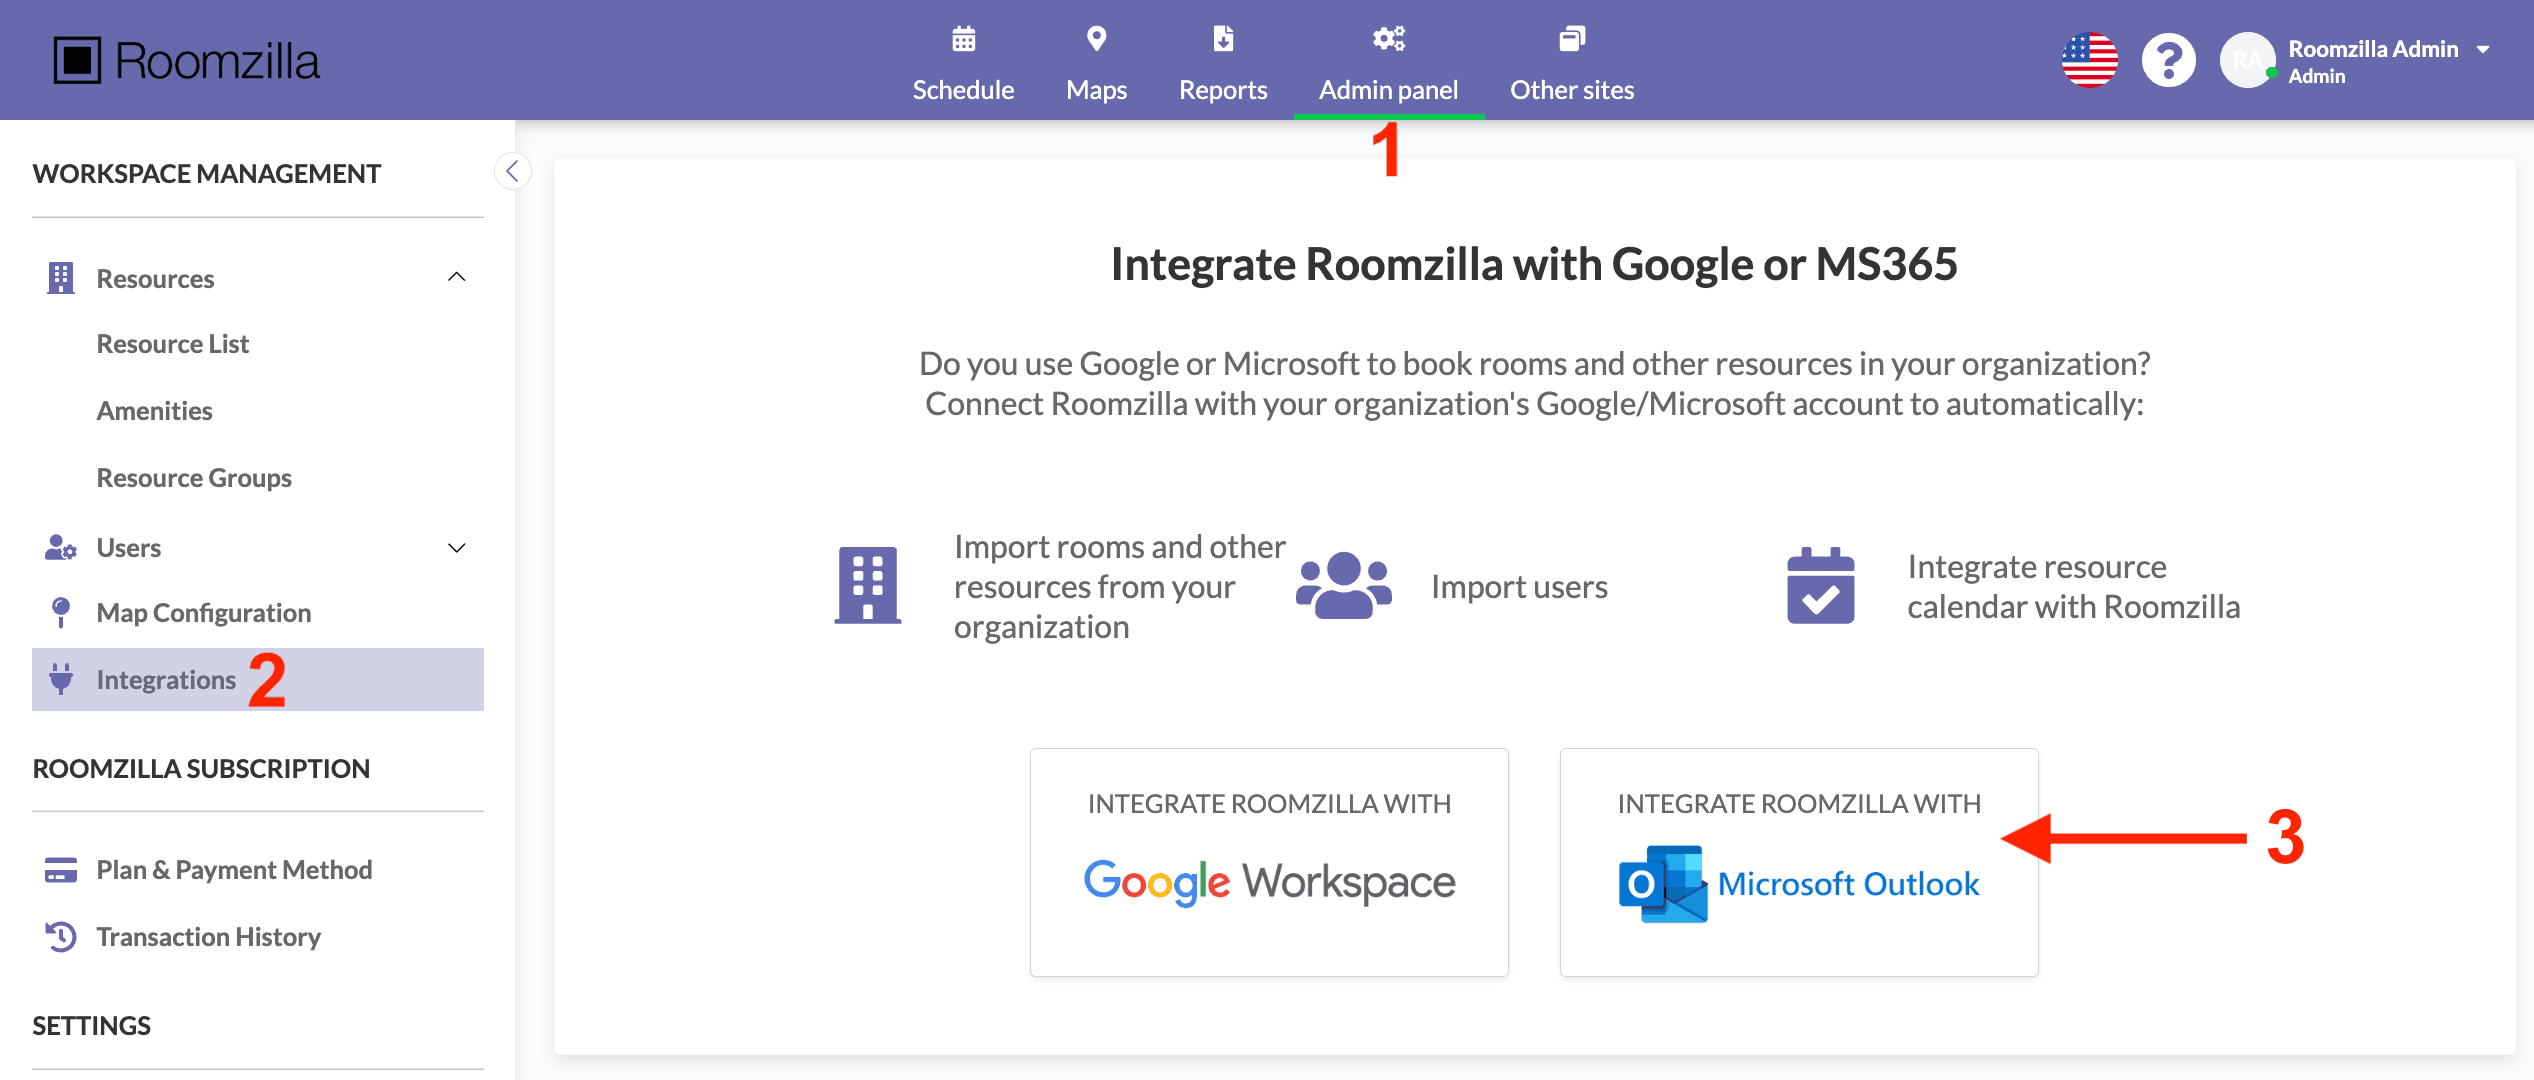
1. Select integration
Go to Admin panel [1] > Integrations [2] > click on the “Integrate Roomzilla with Microsoft Outlook” button [3].

2. Verify integration
After choosing the integration, you’ll be redirected to the Microsoft login page. Here, please authenticate by logging in with a global admin account holding the required permissions within your company’s Microsoft account.
Note: While integrating, Roomzilla receives a token for a few specific permissions [*] rather than obtaining full global admin access.
Click ‘Accept‘ to continue.
3. Automatic import
Upon authentication, Roomzilla will automatically import your company’s rooms from Microsoft into our system [4] as rooms [5], along with future reservations [6, 7]. ‘Other’ type resources won’t be imported into Roomzilla because they are not considered bookable resources in Microsoft 365, however, you can change the resource type of imported resources in Roomzilla [8]. Additionally, all users within your Microsoft account will be automatically added to Roomzilla. You can revoke access to your Roomzilla platform for particular users through the ‘Users’ tab [9].
Important: If there is an active integration, any new bookable resources added within Microsoft 365 will be automatically synced to Roomzilla as enabled, making them immediately available for user bookings and included in your subscription fee. If you prefer these resources not be available for booking, you’ll need to go to the Resources tab in Roomzilla and disable them by switching the toggle off [10].
Note: We recommend removing [11] any redundant resources from Roomzilla before activating the integration to prevent duplicates. In the event of a naming conflict during integration, the suffix “_1“ is appended to the existing Resource name in Roomzilla [12].
Note: Reservations and users’ details changes are synchronized in real-time. Changes made to the rooms in Microsoft may take up to 10 minutes to be reflected in Roomzilla.
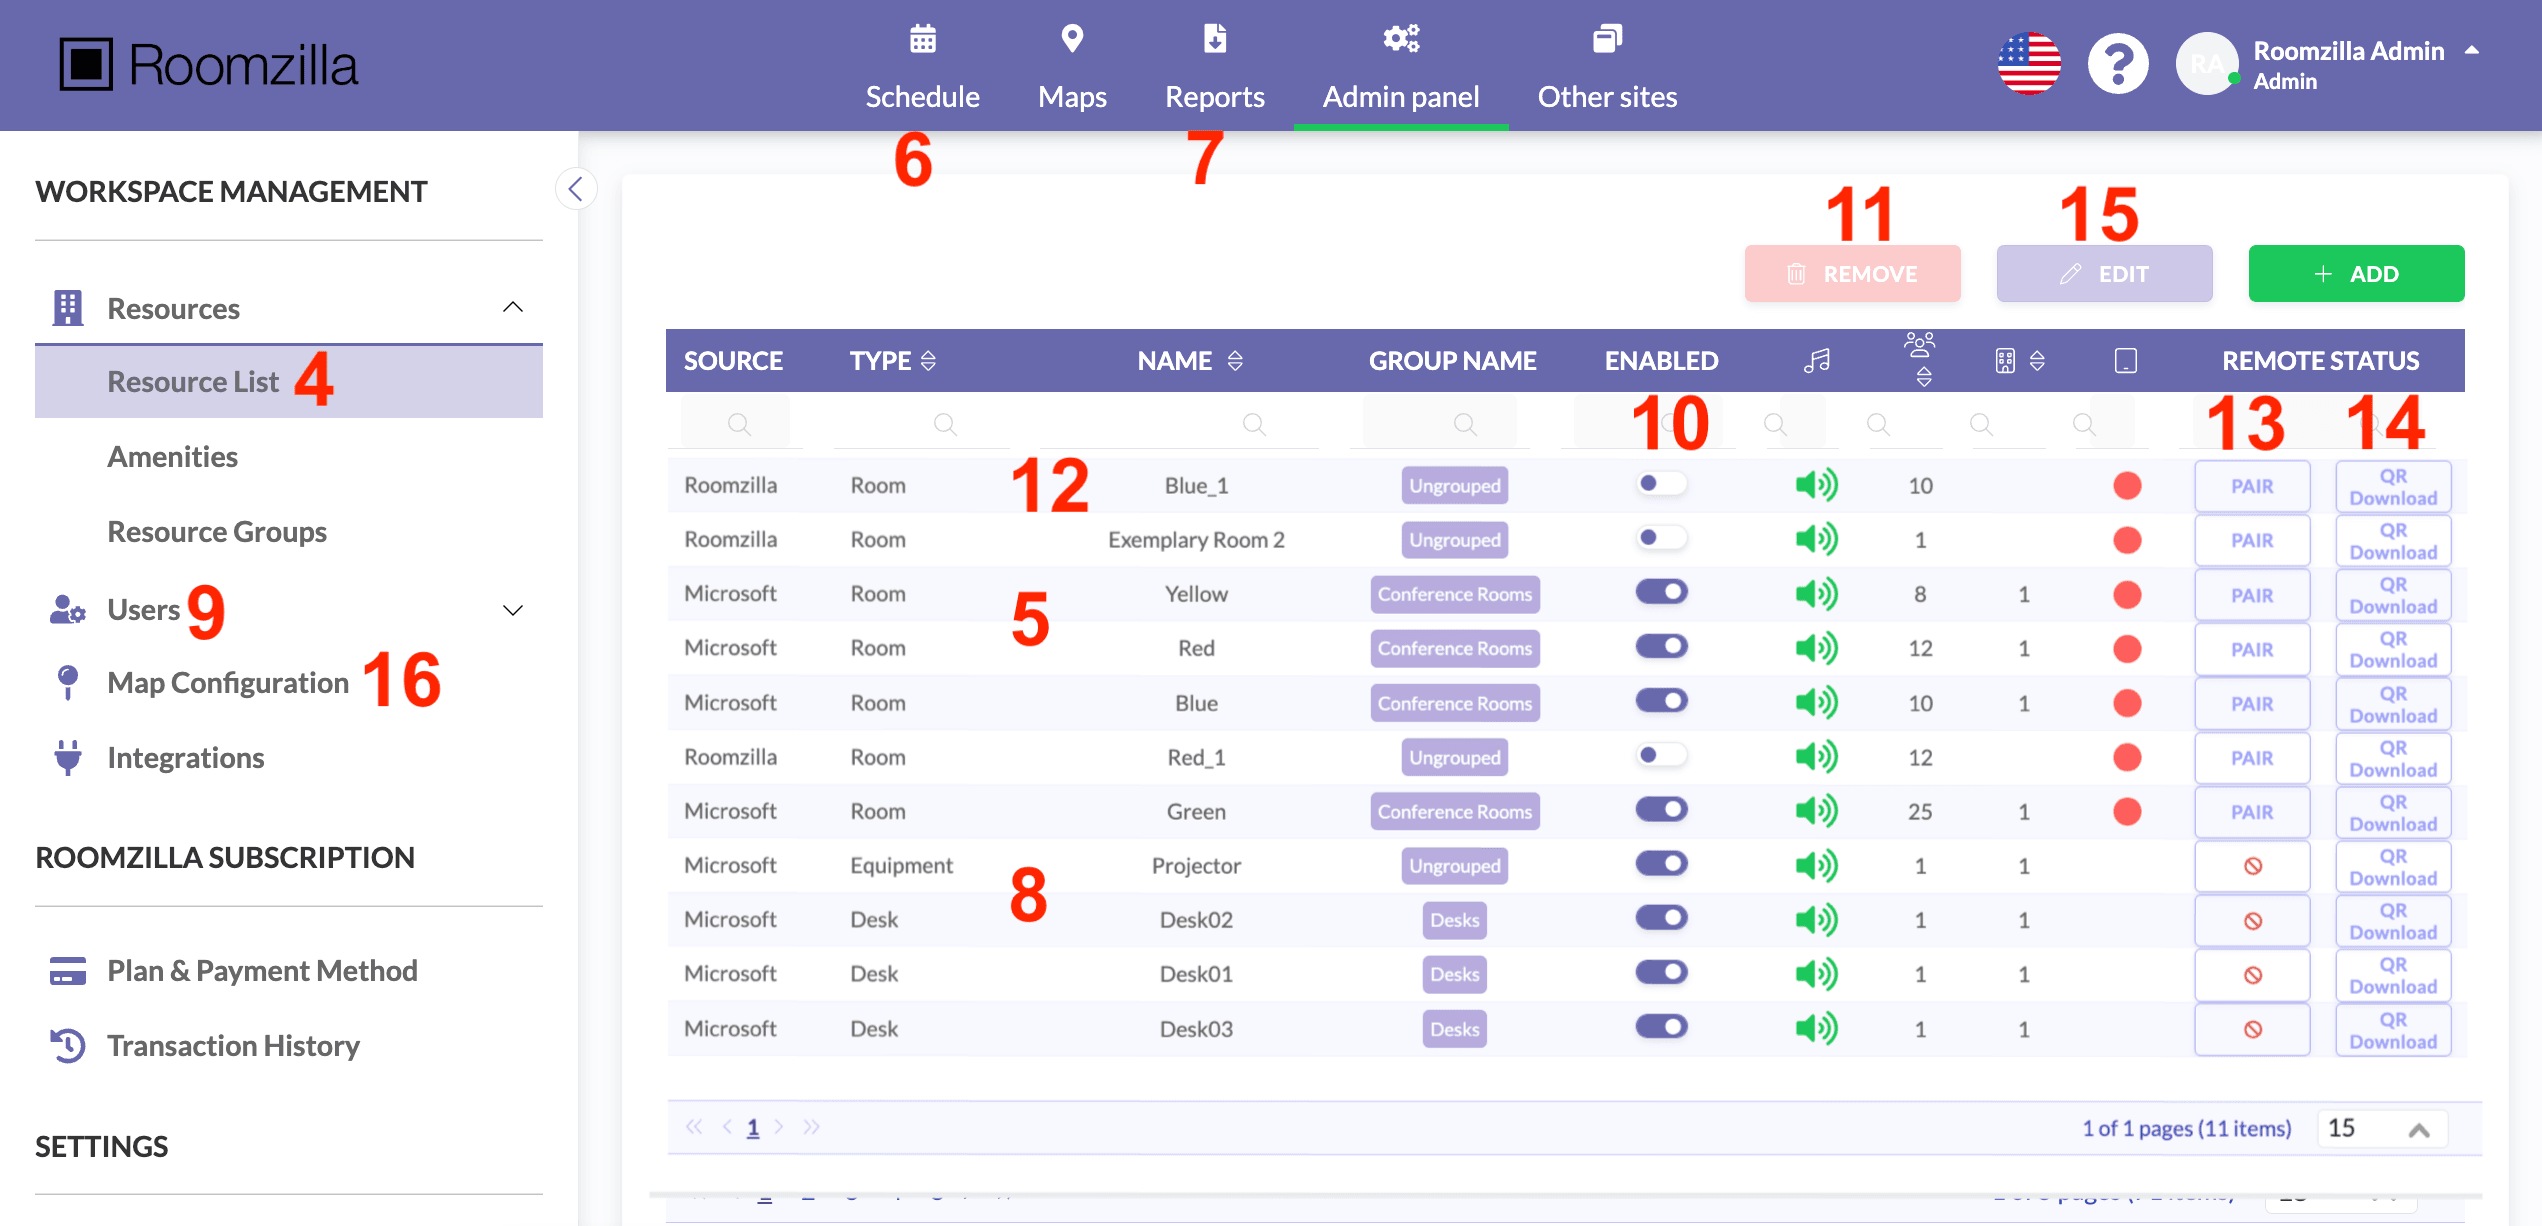
4. Tablet and QR code setup [optional]
To enable quick check-ins and impromptu meetings, Roomzilla offers two powerful features:
[Room Display feature] [13] allows you to pair a tablet or mobile device with a specific room. The tablet will display the room’s availability and allow users to check in or book an impromptu meeting directly from the screen.
With the [QR code feature] [14], an admin can generate a unique QR code for each room, which can then be printed and placed on the door. When a user scans the QR code with their mobile device, it will provide them with the same key functionalities as a room display, allowing them to check in or book the room instantly from their own phone.
5. Invite additional users and add resource details [optional]
Navigate to the “Users” tab [9], where you can add users outside your integrated Google organization to share your resources’ schedules with them. See this article for more details.
Head to the “Resources” tab [4] in order to add additional details to your resources [15]. Here, you can include information such as group categorization, amenities, photos, and a detailed description of each resource. These details will be accessible to users within the Roomzilla web app.
6. Tag your resources on an interactive map [optional]
The “Maps” feature [16] allows you to upload and configure a map of your office. For detailed instructions, please refer to the article on [map configuration].
6. Start Exploring
Once everything is set up, simply start using Roomzilla!
Users from your Microsoft domain can reserve rooms directly from their Microsoft Outlook app by filling in the “Search for a room or location” field. In addition, they can access the Roomzilla web app using Microsoft SSO on your account’s login page.
Users with different email addresses must first confirm their account by following a link from the registration/invitation email and setting up a password. Then, they can use the email and password option or Google/Microsoft SSO, if applicable.
Finally, anyone on-site can start a ‘Local Reservation’ via connected tablets.

If you have any questions, please reach out to us at team@roomzilla.net!